| Excerpt |
|---|
This page includes detailed instructions on how to manage your charging plans. |
...
Charging plans are very flexible since they support prepaid and postpaid calls, therefore, it is necessary to understand them very well. To read more on charging plans, read the Charging area in the VoipNow User Guide.
...
First, access the Charging Plans link in the Navigation Area. Then, click the Add Charging Plan icon and you will be redirected to a new page where you can configure the new Charging Plan.
 Image Removed
 Image Added
Screenshot: Charging Plan Input Form Example
...
There are two charging methods: fixed prices and relative to call costs.
Image Removed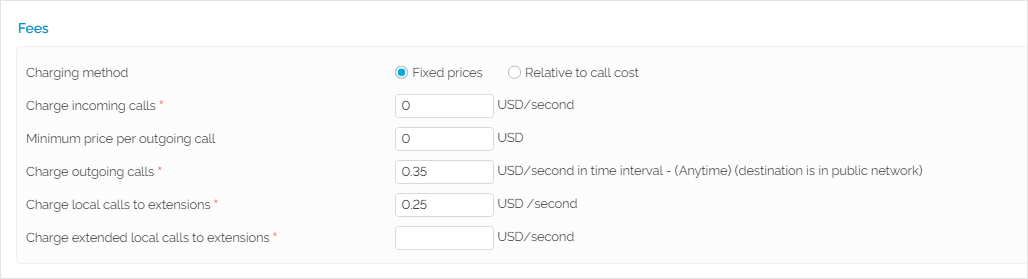 Image Added
Fixed prices
This method charges the same price for all the calls made in the same time interval. It does not take into consideration the real cost of the calls (i.e. the price charged by the channel provider or the call destination).
...
- If the charging plan is applied to a service provider, the call cost is the amount charged by the telephony channel;
- If the charging plan is applied to an organization, the call cost is the price paid by the service provider that owns the organization account;
- If the charging plan is applied to an user, the call cost is the price paid by the organization that owns the user account.
Watch the video below to learn how to create a charging plan and define call destination exceptions.
...
| UI Expand |
|---|
|
Hi and welcome to our series of VoipNow server configuration tutorials. In this video, you will learn to create charging plans and call destination exceptions. - Charging plans determine how the Service Providers, Organizations or Users you add on your VoipNow system are charged for their calls.
- To add a plan, go to the Charging Plans area in the interface, then click on the Add Charging Plan icon.
- Enter a plan name, select calling permissions and the charging policy, which can be prepaid or postpaid. It’s best to uncheck the Unlimited option and set a limit in terms of money or used minutes.
- If you're going for prepaid, then it's good to know that credit verification doesn't occur in real-time; it actually happens at a 15 second interval.
- When you're done with charging policy, select the Fees strategy, which can be fixed or relative to call costs. For the latter, you need to multiply your cost with a factor - for example, 1.5, or add an overcharge - let's say, 0.0005 USD per second.
- For now, let’s choose a charging strategy with fixed costs. Let’s say 0.0005 USD per second. This means that calls are charged at a rate of 3 cents per minute. Calls to local extensions are free, with 0 costs.
- Now let's go back to setting charging segments. In our case 60/1 is a good choice - it refers to billing per second after the first minute.
- Charging segments work differently, based on the fees strategy you select, which is why we configured the fees strategy first. When selecting a Relative to call cost strategy, the segments apply only to what you have entered in the second fields, the ones after the plus sign.
- So, for example, if we have set a relative to call cost fee strategy and we enter 1.5 times the call cost, plus 0 USD per second, then the charging segments will only apply to the zero in the second field. This is important to know when determining your fees strategy and charging segments.
- Next, we'll add charging exceptions. These are needed when you don't want to charge all calls to all destinations at the same rate. You can add call costs in the destination exceptions area. Here are a few examples:
- We choose to charge Germany landline, area code 49 at a rate of 0.04 per 60 seconds, then 0.004 every 6 seconds.
- Then we will add Germany mobile, code 4915 at 0.08 for the first 60 seconds then 0.008 every 6 seconds.
- And then another one, Germany mobile 4916 at 0.08 per 60 seconds then 0.008 every 6 seconds, and so on.
- As a tip, it’s better to load an already prepared file with all destination exceptions into the system. Moreover, you can create packages with free minutes included. Since charging exceptions apply to the exact number dialed by the extension, it's also a good idea to add all the number formats that may be dialed by your users.
- Note that you can set several charging plans that can apply to multiple Service Provider accounts you have created in VoipNow.
Now that you know how to create a charging plan, it's time to start creating user accounts. To learn how to do that, please watch the video tutorial in the Creating Accounts page. |
...
...
...
 Except where otherwise noted, content in this space is licensed under a Creative Commons Attribution 4.0 International.