...
You must perform the MySQL installation using the installer script with the mysql argument. Run the following command.
| Shell |
|---|
curl "http://www.4psa.com/software/ |
...
voipnowinstaller.sh" -o voipnowinstaller.sh -L |
Run the installer with the mysql argument.
| Shell |
|---|
| sh voipnowinstaller.sh mysql |
When asked, enter the local server IP. This will be used later on, when installing the Infrastructure Controller.
...
A file called voipnowcredentials.conf will be generated. Its contents will be required when installing the Infrastructure Controller. If you want to add MySQL slaves, you can provision the infrastructure now and add them later. This will not affect the system uptime. However, to provision slave MySQL nodes, run the following command.
| Shell |
|---|
| sh voipnowinstaller.sh mysql slave |
| Note |
|---|
| Please note that this command will only add the node. No MySQL replication will be performed. |
...
Anchor ic_setup ic_setup
Install the Infrastructure Controller
The node where you install VoipNow for the first time is relevant because it will work as an Infrastructure Controller for your entire infrastructure.
Make sure that VoipNow knows where MySQL is installed by setting the shell environment variables below. You can copy these variables from the voipnowcredentials.conf file generated on the MySQL node installation.
| Shell |
|---|
export ALT_DB_HOST=<hostname> |
VoipNow will provision the system using the MySQL node that has been specified in the ALT_DB_HOST value as the master.
...
Install VoipNow using the Command Line Installer. Once the installation is complete, you will have a functional VoipNow system with:
- most Most of the roles installed on the same node as the Infrastructure Controller.
- a A node with the SQL role assigned.
Log in to VoipNow's web management interface as administrator. Navigate to VoipNow ? >> Cloud Management. You will see an image like this one.
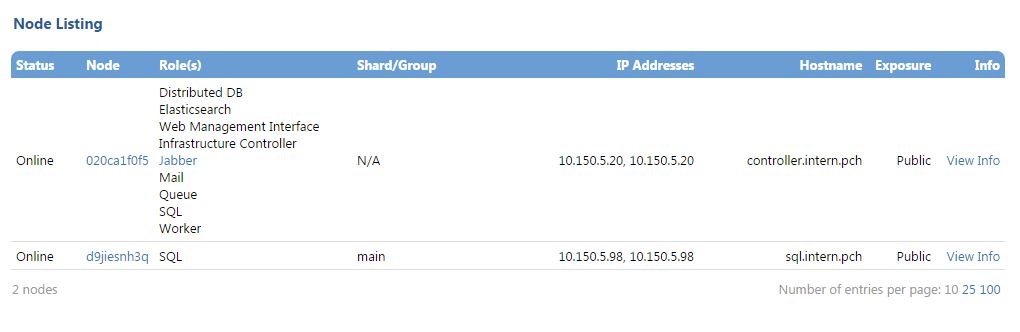
Screenshot: Your infrastructure should look like this.
Click on the Infrastructure Properties button. Set up the infrastructure properties according to your physical infrastructure organization as described in the Distributed Installation.
...
Infrastructure Advice section.
| Note |
|---|
In order to be able to add new nodes, you need to enable the distributed firewall rules by running the following command:
|
Anchor provision_node provision_node
Add new nodes
| Note |
|---|
| You cannot add new nodes unless you have a distributed license. To do that, go to Unified Communications >> License Management page. Get the Infrastracture ID from the License Key Status in the upper page and supply it to your Account Manager to receive the license key. |
...
- General Description of the Role
- Networking Requirements
- High Availability
- Hardware RequirementsDistributed Installation
- Distributed Installation
| Anchor | ||||
|---|---|---|---|---|
|
...
For more details on the Infrastructure Controller provisioning, check the Distributed Installation. Cloud Infrastructure Controller installation. Cloud Management is the web management interface area where everything related to your infrastructure cloud is managed.
- Log in to the Infrastructure Controller node as administrator (if you are not already logged in). First, add a new node in the management infrastructure. Go to VoipNow Cloud Management -> Add Node. This document describes how to add nodes to the distributed infrastructure and how to assign them roles.
Anchor seskey seskey - Assign the role on the node. Once you have added the node, it will appear in Cloud Management (with status 'Offline' and no role on it). Click on the [Assign a Role] link next to the the NodeID row.
- Eligible roles: This is an informative field. You will see here all eligible roles based on the networking parameters of the node. For example, if the node does not have any public IP address assigned, it will not be possible to run a SIP role.
- Role Type: Select the PBX role from the list.
- Bind IP : Port: Fill in the IP and port you want to bind the role to. While it is possible to use any (0.0.0.0), this is strongly not recommended.
- Connection IP : Port: Fill in the IP and port where other roles must connect to this role. Usually, it is identical to Bind IP : Port.
The role will be added, but it will still be offline. You have to build a container that will run it. You will get a command with a session key that needs to be copied. You will need this key in the following step.
| Anchor | ||||
|---|---|---|---|---|
|
Provisioning the container
Install VoipNow on the Container where server where you want to run the Node. This container might have been already prepared. The installation of VoipNow must be performed in Stand-By Mode. For this purpose, run the following commands:
| Shell |
|---|
| export VNSTANDBY=1 sh voipnowinstaller.sh |
| Note |
|---|
| VoipNow will be installed, but beware that this installation will not be able to run independently! The container is prepared to run a node at a later point, once it receives indications from the Infrastructure Controller. |
Use the command below to get the node on this container.
| Shell |
|---|
/usr/local/voipnow/bin/nodeconfig --scenario activate --controller <infrastructure controller ip> --sessionkey <sessionkey> |
The command is the one you got when you assigned the role on the offline node.
...
You can now start building your planned infrastructure by adding more nodes the same way you did above.
Update the Infrastructure Controller
The update requires taking the following steps.
VoipNow must know where MySQL is installed. For this, you must set the following shell environment variables.
| Shell |
|---|
export ALT_DB_HOST=<hostname> |
| Shell |
|---|
curl "http://www.4psa.com/software/voipnow35installer.sh" -o voipnowinstaller.sh -L |
Update the MySQL master node
To update the MySQL Master node, you muse use the provided script and take the steps below. Run the command below.
| Shell |
|---|
curl "http://www.4psa.com/software/voipnow35installer.sh" -o voipnowinstaller.sh -L |
| Shell |
|---|
| export ALT_DB_HOST=<hostname> export ALT_DB_PORT=<port> export ALT_DB_USER=<user> export ALT_DB_PASSWD=<password> export ALT_DB_NAME=<database> |
| Note |
|---|
| Credentials can be found in voipnowcredentials.conf |
...
| Note |
|---|
For more info on VoipNow's upgrade procedure, visit this page. |
...
| 4psarelated | ||
|---|---|---|
| ||
 Except where otherwise noted, content in this space is licensed under a Creative Commons Attribution 4.0 International.