| Excerpt |
|---|
This page contains information on the settings you need to make for the extension types available in VoipNow. |
| Table of Contents | ||
|---|---|---|
|
Overview
Extensions must be created under a User account.
To access a user account, simply click the Users link in the Navigation area and you will see the user accounts you have created.
To add an extension, select the user that will be the owner of the extension. After creating the time intervals and the charging plans, you may proceed to adding the extension.
Requirements
In order to create an extension in the user context, you must first add:
Time intervals
- These are necessary for the organization charging plans;
- These charging plans can be applied to the users in the organization context;
- They define how the organization charges its users;
- For a user, time intervals can be created by clicking the Time Intervals icon available in his context;
Charging plans
- As soon as the time intervals have been added, you can start creating charging plans.
- For an organization, charging plans can be created by clicking the Charging Plans icon available in its context.
Forbidden numbers
- This step is not compulsory, but it is recommended.
- Before adding extensions to the system, you should define a list of forbidden extension numbers (i.e. numbers reserved for special purposes, which will not be assigned to regular extensions).
- You can do this by accessing the Unified Communications link in the left panel and then the Forbidden Extensions icon.
Set up the extension
To add a new phone terminal extension on a specific user account, click the Add Extension icon in the Extensions page. Then select the user you want to add the extension to and fill in the required data.
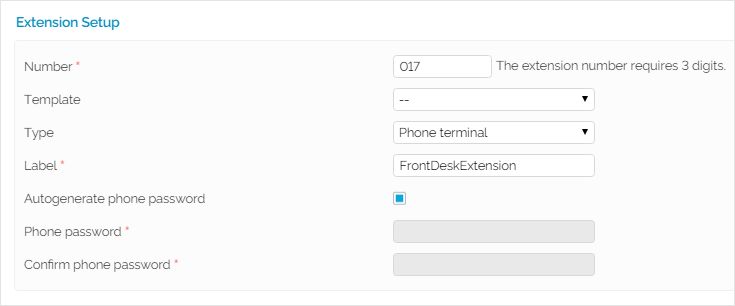
Screenshot: Phone Terminal Extension Creation Input Form Example
- Number: The value in this field is generated automatically and it represents the lowest extension number not currently in use by the user account. To specify a different extension number, use the text box to enter the desired value. VoipNow will display an error message if you try to assign a number defined as a forbidden number. The VoipNow administrator is the one who defines the list of forbidden numbers.
- Template: You can choose to create an extension based on a template. A template contains default settings that will be used to create the extension.For more information on extension templates, please see the VoipNow Guide.
- Type: Choose one of the available extension types supported by VoipNow.
- Label: Fill in a descriptive name for the extension.
- Autogenerate password: When this field is selected, VoipNow automatically generates the extension password.
- Phone password: If you don't want an automatically generated password, you can create one of your own that you need to re-enter in the Confirm phone password.
| Anchor | ||||
|---|---|---|---|---|
|
Select public phone numbers
This section is displayed only if one of the following conditions are fulfilled:
- There is at least one public phone number available in the system, i.e. which has not been assigned to another extension account
- When logging in with an organization account, the Phone numbers management permission is enabled.
When you assign a public phone number to an extension, the number becomes exclusive to that account. No other extension will be able use it. From that moment, callers outside the VoipNow system will be able to reach the extension by dialing the assigned public phone number.
- User pool: The list contains all the user's unassigned public phone numbers. To assign a public phone number to the extension, click the desired number and it will be automatically moved into the Assigned on extension pool. These public phone numbers can be used by the Phone terminal extensions as CallerIDs for outgoing calls.
- Assigned on extension: This list contains all the public phone numbers assigned to the extension. To remove a phone number from the pool, click the desired number and it will be automatically moved back into the User Pool list. When you assign a public phone number to an extension, the phone number becomes exclusive to that extension. No other extension will be able use it. From that moment on, the callers from outside the VoipNow system will be able to reach that extension by dialing the assigned public phone number.
| Anchor | ||||
|---|---|---|---|---|
|
Set sharing policies
The extension user will be able to read shared information from their own interface, but he will not be able to delete anything.
| Note |
|---|
You can only control the extension's sharing policies if its Extension is multi user aware permission is enabled. |
Share my call history with
This sharing option is the only one available for all the extension types. Also, it is the only one that can be customized when adding a new extension.
The voicemail, fax message and call recording sharing options can be customized once the required permissions, specific to each extension type, have been granted on the following configuration page.
From the Available groups lists you may choose with whom the extension will share its call history:
- EVERYBODY: If you select this option, then the extension will share its data with all the extensions from the organization.
- NOBODY: The extension will not share anything with anyone.
- <group_name>: The list displays all the groups created by organization where the extension's user is member. You can choose the group(s) the extension will share data with by clicking the corresponding name. You may select as many groups as you want. To unassign a group, simply click on its name in the Assigned groups list. Also, if you want to unassign all the groups, click NOBODY. Inside a group, it is not necessary for an extension to have any sharing option enabled in order to be able to see another extension's call history. Extension 1 shares its call history with
NOBODYand it is member of Group A. Extension 2 is part of the same Group A and shares its call history with all the group members (it has the <group_name> option selected. Then, Extension 1 will be able to see the call history for Extension 2.
Extension type parameters
Each extension type has different parameters that can be setup. If the Select extension type parameters option is checked, you can setup these parameters according to the selection you have made in the Type field:
| Children Display |
|---|
You can also choose to set these options later, by clicking the Phone Terminal Setup icon available in the extension's management page.
Connecting a phone to your extension
As soon as you are done with creating a Phone terminal type extension, you can connect a phone to the system and start making calls.
Requirements
You need a software or a hardware SIP phone. Most phones require the following details:
- Username: The user name is displayed in the extension context, in the Extension Overview section.
- Password: The password is the same with the extension user interface password, which was set up when the account was created. It can also be edited in Edit Extension Information page.
- SIP Server: The address of the SIP server is the IP or hostname of the server where VoipNow is installed.
- SIP Proxy Address: You can set the same value as the SIP server address.
Check connection
The phone terminal will report the status of the connection to the system.
Echo test
You can try an echo test to check if the connection is OK. To perform the echo test, dial *52 from your extension phone keypad.
System registration
When the extension is registered to the system, you can also see it in the VoipNow interface. Go to the extension context and, if your phone terminal is registered, it should be displayed in the Extension Overview area.
| 4psarelated | ||
|---|---|---|
| ||
 Except where otherwise noted, content in this space is licensed under a Creative Commons Attribution 4.0 International.