How to create an IVR
IVRs can be added and configured in the VoipNow interface just like any other extension.
- From the Quick Links section of a user account, select Add Extension, then configure the basic settings for the IVR extension.
- Set a name and label for your extension and select IVR from the extension type drop-down list. If needed, here you can find extended information regarding the general settings.
- When done with the basic settings, check the Select extension type parameters box, then press OK.
- You will be redirected to an advanced settings page, where for starters it's recommended to leave everything on default.
- Press OK and your IVR will be created.
To learn how to customize these settings, please read the IVR section in the VoipNow User Guide. Note that you can always come back to these settings in the IVR Setup section of the Quick Links area.
How to customize it
Add contexts
Add as many contexts as you need for your IVR. For example, you can have an entry context and two additional contexts: one for working hours and one for non-working hours.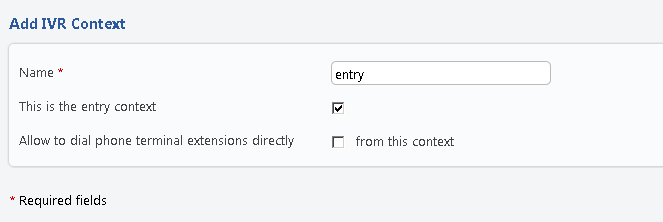
Click the Add Context icon to set up a new context and define its settings considering the explanations below:
- Fill in a Name for the context. In our example, "entry".
- This is the entry context is an option you need to enable if you want to use it for an entry context. Otherwise, leave it unchecked.
- Allow to dial phone terminal extensions directly from this context enables the caller to dial the short number of the extension they want to reach directly from this context. This means that the caller will not be required to wait for a certain context/action to dial that number. This option can be enabled for several contexts at the same time.
- When done with these preferences, click OK and save the new context.
Learn more about IVR actions from VoipNow User Guide, or proceed by editing the Context Options, as described in the following section.
Add Actions
Several options are available for each context.
- start: The start option is automatically activated when somebody calls the IVR extension.
- timeout: One or several actions are executed when the caller remains inactive during the timeout time interval defined for the IVR.
- invalid: One or several actions are executed when the caller presses a key (0–9, *, #) which has no action associated with it.
- 0–9, *, #: One or several actions are executed when the caller presses the corresponding key on their phone pad.
Any of these options can have a sequence of actions. To edit either of the options above, follow the steps below:
- Click the option link to define a set of actions.
- From the drop-down list, select the action you want to edit. Here you can find out what each action does.
- Select the position of the action in the sequence for the context.
- From Action Details, further set the way the action behaves. For instance, for the Play sound action, you can select the sound file that should be played.
- Click OK to save.
To create a fully working IVR, you need to link contexts together with the help of the Jump to action.
Example:
If the caller presses 1, jump to option 1 in the Start context.
If the caller presses 0, jump to option 2 in the Start context.
How to generate it
Once you're done creating your contexts, each with an appropriate set of actions, you can test your IVR to see how it works. This can be done from the IVR menu in the upper side of the interface.
![]()
If the IVR works as intended, you can then generate it and make it publicly available. More info on testing and generating IVRs, here.
Tips and tricks
If you want to replicate all the settings of an existing IVR and get your new IVR set up faster, you can use the Clone IVR Settings From option. Simply select the IVR you want to copy from the drop-down list.
Remember to check the IVR Report for structural errors after cloning another IVR.
If you clone an IVR extension that belongs to another service provider, some problems may arise.
If an option that transfers calls to an extension number is enabled, the system does not copy that extension number.
Also, for options that transfer calls to extensions in specific time intervals, the time intervals is not copied.
Need help? Ask a question in our GetSatisfaction community.
 Except where otherwise noted, content in this space is licensed under a Creative Commons Attribution 4.0 International.