

Setting the Routing Rules
This page describes how to create outgoing routing rules.
Overview
VoipNow can route calls based on the call destination and cost. The Routing rules describe how a call is sent to destination. They are associated with charging plans. Without routing rules, calls cannot be routed to the destination. To add a new routing rule group, follow the steps below, go to Channels link in the Navigation Area, click the Outgoing routing rules icon, and enter the details of the new routing rule group.
Routing Rules
VoipNow allows you to define four routing rule types.
""
Only the Route through rule can be set as final!
Route through
In this case, the call is directed through a particular channel.
Process Target Number
This rule can be used to perform complex operations (e.g. deleting or inserting digits, adding a prefix, etc.) on one number before directing the call through a particular channel.
Portability Check
This rule is used to identify the network a number belongs to and to choose the appropriate charging method for determining the call cost. The routing rules following this one select the call cost based on the results provided by this rule.
""
This routing rule is not available unless the Number portability engine option is enabled. By default, this option is disabled. To enable it, navigate to the Unified Communications → Zero Priority → Charging tab. VoipNow provides the engine that checks for portability, but if a certain customer wants to create a portability client, they should contact the customer support center for detailed information.
Block
VoipNow forbids the call to be initiated to the provided destination number. The Block rule is final by definition, in the sense that, when the rule is matched, the other rules are no longer checked. Example:
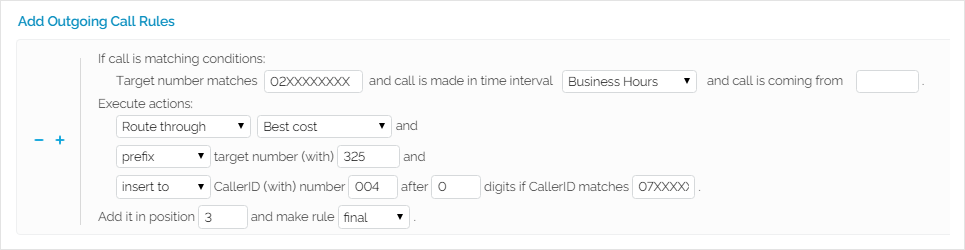 Screenshot: Routing Rules Input Form Example
- If an extension user dials a number starting with 02 followed by any other 8 digits, 02XXXXXXXX, during the Business hours time interval, then the call is routed through the cheapest channel, Best cost;
- The destination number is prefixed with 325 becoming 32502XXXXXXXX; also, 004 is added to the extension's CallerID before the first digit if its public number matches any 07XXXXXXXX combination, resulting a new CallerID, 00407XXXXXXXX;
- The rule is added in the third position and it is considered final;
- It is advisable to place the Route through action on the last position inside the outgoing rules group;
- The logical sequence is to first Block calls to certain destinations, then to Process target number or to perform the Portability check and as soon as all these actions are triggered, to allow certain calls matching the Route through rule to reach their destination.
""
Highly Important
The rule's position in the group is very important because it defines the order in which VoipNow matches the call rules.
The number entry supports the Asterisk number matching. You can enter a basic regular expression containing:
X matches any digit from 0-9.
Z matches any digit form 1-9.
N matches any digit from 2-9.
\[\] matches any digit or letter in the brackets.
\ matches 0, 1 or any number of the previous expression.
. matches one or more characters.
Example:
- Number
0.will match any number starting with 0. - Number
1X[123]Nwill match any number starting with 1, followed by any digit between 0 and 9, followed by 1, 2 or 3 and followed by any digit between 2 and 9, for example 1528.
To customize rules for outgoing calls routed outside the VoipNow system through the channels available. You can group these rules according to four algorithms.