...
In order to use the resources exposed by VoipNow, a developer must register the App with the system . There are two possible registration methods used by the system as described belowfrom the interface.
| Tip |
|---|
| Any single user can register a maximum of 1000 Apps. |
| Anchor | ||||
|---|---|---|---|---|
|
Use the public endpoint
This type of registration is recommended. It allows an App to register to an account, without requesting the developer to know the credentials of a user and log in to the system's interface.
Step 1
The App redirects the user to the server registration endpoint. The App must make a HTTP POST or GET request to the registration endpoint located at https://<hostname>/oauth/register.php.
| Note |
|---|
| The App is required to use TLS when making the request. |
The request URI is made by adding the following parameters to the query component (when using GET) or to the body of the request (when using POST) using the application/x-www-form-urlencoded format:
| Name | Required | Description |
| name | Yes | Descriptive name for the App (e.g. Google Apps). |
| description | No | Specify some brief details about the App. |
| homepage | Yes | Apps homepage. This link is displayed to the users when authorizing the App and should describe the functionality of the App. |
| image_uri | No | URI where the system can find a relevant App image. |
| Yes | Email address of the administrator of the App. | |
| phone | No | Phone number of the administrator of the App. |
| redirect_uri | Yes | URI where the system returns the registration and authorization response. Please note that the redirect URI can only be a HTTPS link. |
| api | No | The type of API for which to register the App. Posible values: unifiedapi and systemapi. Default: unifiedapi |
| state | No | Apps use this parameter to verify that the response received from the system is valid. |
The example below demonstrates how to make a POST request to the registration endpoint:
| Code Block | ||
|---|---|---|
| ||
POST /oauth/register.php
Host: <VoipNowHostname>
Content-Type: application/x-www-form-urlencoded

name=UnifiedAPIApp&redirect_uri=https://<AppHostname>/app/redirect/endpoint/&homepage=https://<hostname>/app/homepage/&image_uri=https://<hostname>/app/image/&email=app@email.tst&phone=3334444&api=unifiedapi&state=appstate |
Step 2
App requests user permission. Once the App makes the request, the following form appears to the user:
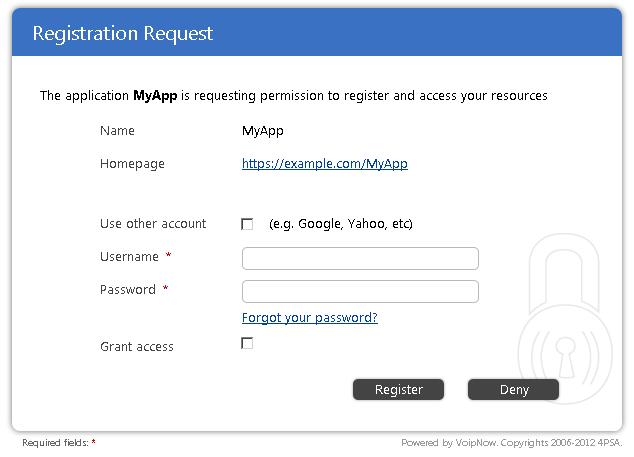
Step 3
User allows or denies the registration. To allow the registration of the App, the user must enter his/hers credentials and click the Register button. The user can also log in to VoipNow using a the account of a third-party application (e.g Google). To deny the registration of the App, the user must click the Deny button. The user can also authorize the App by clicking the Grant access checkbox. When using this option, the response also contains the authorization code parameter.
Step 4
App receives the response. If the user allowed the App to register, the system will redirect him/her to the URI specified in the redirect_uri parameter. The system uses the HTTP GET method to make the request. It will also attach the parameters as received in the request and the App Key and Secret as in the following example:
| Code Block | ||
|---|---|---|
| ||
GET /app/redirect/endpoint/?name=UnifiedAPIApp&redirect_uri=https://<hostname>/app/redirect/endpoint/&homepage=https://<hostname>/app/homepage/&image_uri=https://<hostname>/app/image/&email=app@email.tst&phone=3334444&api=unifiedapi&state=appstate&client_id=5~2wKMPg9h~GExN3s01-7wX2XmLI_Xbz&client_secret=Q-jxXg90OX_mCpXvLfw.V12X3NQv-nc5
Host: <AppHostname>
Content-Type: application/x-www-form-urlencoded |
Use the system interface
When developing and testing your App, use this type of registration.
Step 1
Navigate to the
...
Authorized Apps page
. If you want to register an App to an Administrator a Service Provider, Organization or User account you must go to Unified Communications -> Integration Integrations -> SystemAPI & UnifiedAPI. If you want to register an App to a Service Provider, Organization, or User account go to the home page of the account and click the SystemAPI & UnifiedAPI button. Then choose the type of API the the App will use:
- For Apps that use SystemAPI, click on the SystemAPI tab.
- For Apps that use UnifiedAPI, click on the UnifiedAPI tab.
| Note |
|---|
| When using an account of type Service Provider, you will not be able to add Apps for UnifiedAPI. |
Step 2
Click the Add App button. Fill in the required information in the pop-up that opens.
Apps.
There are two tabs: Apps Management and App Registration.
To add an app to the system, select the App Registration tab and click the Add App icon.
Fill in the app form
Fill in the required information taking into account the example below.
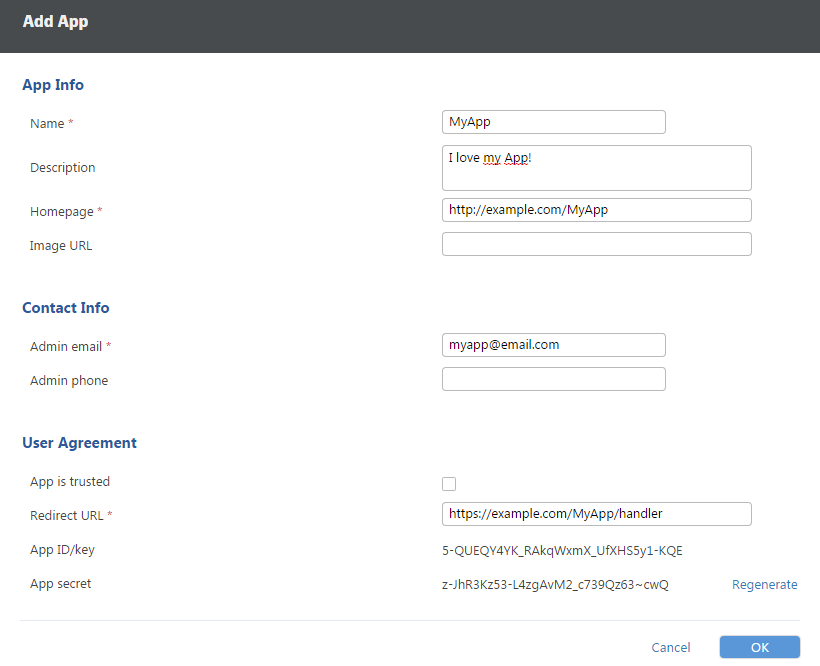
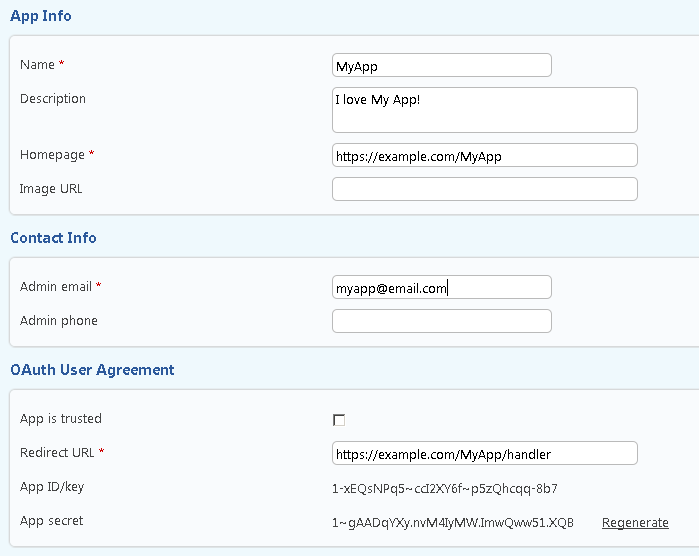
Screenshot: Editing an authorized App
The following options are available:
- Name
...
- : Fill a descriptive name for the App (e.g. Google Apps).
- Description
...
- : Specify some brief details about the App.
- Homepage
...
- : App's homepage. This link is displayed to the users when authorizing the App and should describe the functionality of the App.The domain name can contain characters from any official language script. Domain names that contain these special, so called non-ASCII, characters are called Internationalized Domain Names (IDNs). VoipNow supports IDNs.
- Image URL
...
- : URI where the system can find a relevant App image.
- Admin email
...
- : Email address of the administrator of the App. The email address can contain characters from any official language script. Domain names that contain these special, so called non-ASCII, characters are called Internationalized Domain Names (IDNs). VoipNow supports IDNs.
- Admin phone
...
- : Phone number of the administrator of the App.
- App is trusted
...
- : When this option is active, the App can use only the App Key and App Secret to generate an access token, and no user authentication is required.
...
- Activate this option only if you trust the App.
- Redirect URL
...
- : URL where the system returns the registration and authorization response. Please note that the redirect URL can only be a HTTPS link.
- App ID/key
...
- : A general app identifier, unique to your app.
- App secret: The 32 char-long secret used by the system to establish ownership of the App key.
...
- Based on this pair, the system will recognize the new App and will allow it to generate an access token.
...
Confirm settings
Click OK to confirm the settings and add the new App or Cancel to stop the process and close the window.
...
In some cases it is required to invalidate the old secret of the App. In this case, just click the Regenerate button located next to the old App Secret. This action will invalidate all the access tokens currently owned by the App.
...
 Except where otherwise noted, content in this space is licensed under a Creative Commons Attribution 4.0 International.