...
| Table of Contents | ||
|---|---|---|
|
Requirements
- Virtual machine or hardware compliant with VoipNow requirements
- Hostname
- Certificate for the hostname or wildcard for the domain signed by a public CA
| Note |
|---|
This guide contains the steps to take for enabling Hubgets services and creating your first Hubgets organization and user. However, the values of the settings explained here are just for exemplification and testing purposes only. |
#1 Install the SSL certificate
The certificate must be installed in /etc/voipnow/certs directory.
...
| Note |
|---|
Please keep in mind that you need to update at least the certificates for Kamailio and HTTP. |
#2 Change your default admin password
For security reasons, it's best to change your default password if you haven't done it until now.
...
| Code Block |
|---|
/usr/local/voipnow/bin/chadminpass.sh |
#3 Follow the wizard instructions
- Log in the VoipNow interface using your username and recently changed password. You will be redirected to the Terms of Service page.
- Make sure to agree with the Master Service Agreement. Otherwise you won't be able to continue the Wizard tour.
- You will be prompted to the VoipNow Start Up Wizard page.

- If you haven't changed your admin password in STEP #2, you can do it in the Start Up Wizard page. If you already changed your admin password, this section will no longer be displayed.
- In the Quick Configuration section, the Ask for this wizard on next login also is enabled by default. Make sure to deselect it so that you can start the configuration process.
- Select the Configure charging plans and Create Demo channel to 4PSA Demo system options. To make the configuration process easier for you, we have already created a default charging plan and a demo channel that will allow you to test Hubgets.
- Press Next to continue the configuration process.
| Note |
|---|
If you don't want to use the default charging plan and DEMO channel, you can easily create them by yourself later. However, for the evaluation period, we recommend that you use these default settings. |
#4 Enter your admin contact details
Fill in the required fields of the Admin Contact Information page and pay special attention to the email address for your admin account. This address cannot be the same as the one you're going to use for your account.
| Note |
|---|
You cannot use the same e-mail address for your admin and user accounts! |
#5 Set your codecs right
Go to System → Unified Communications → Zero Priority → General and make the following changes:
- Under Extension Settings, select the following mandatory codecs: G.711 A-Law, G.711 u-Law, all Opus codecs, H.264, VP8 and VP9.
- Scroll down to the Message Notifications section and enter an email address in the Server sends emails from address field. VoipNow will use this email address when sending system notifications to users.
- Go to the In the 'From email' field appears field and write "Hubgets" instead of the default "4PSA VoipNow".
- Press OK when you're done.
#6 Set your SIP preferences
Go to System → Unified Communications → Zero Priority → SIP and make the following changes:
- Under Global SIP Preferences, you need to set the Extension number length to 4 (to avoid overlapping emergency numbers like 911, 112, etc.) and set the User agent as Hubgets.
- Scroll down to Advanced SIP Server Preferences, fill in your domain and port in the Accept SIP requests to domain:port field.
- Press OK when you're done.
#7 Create an Extension template
In order to be able to invite users on Hubgets, you need to create a Subscription template. Your Subscription will use a specific Extension template and a customized charging plan.
...
Your Hubgets Webphone template will be added to the system and you will find it in the Extension Templates table.
#8 Customize your charging plan
Since in the Wizard tour you opted for a default charging plan, you will find it already added to the system.
...
Your Hubgets Charging Plan will be added to the system and you'll find it in the Charging Plans table.
#9 Create a Subscription template
Now that you have created an Extension template and you have a customized charging plan in place, you can create a Subscription template.
...
Your Subscription template will be added to the system and you will find it in the Organization Templates table. When you create your Hubgets Organization, the system will use this subscription template.
#10 Create a Service Provider account
| Note |
|---|
If in the Wizard tour you didn't opt for a default charging plan, you need to add a charging plan to the system before creating this Service Provider account. |
...
- Select the account from the Service Providers table.
- In the provider's Management Tools page, go to Templates → Email Templates.
- In case you want to sell Hubgets accounts only, you need to go to the Email Templates Management page and disable all email templates for Organizations and Users. This will prevent your customers from receiving notification emails from VoipNow. Otherwise, leave these settings as they are.
- Press OK when you're done. The Service Provider's email templates will be updated with your latest changes.
#11 Create an Organization account based on subscription
To create an Organization, select the Service Provider account you've just created. You will be redirected to the provider's Management Tools page. Click on Add Organization and follow the instructions below:
...
Your Organization will be added to the system and you will find it in the Organizations table.
#12 Create a User account
To create a User account, select the Organization you've just created from the Organizations table. You will be redirected to the Organization's Management Tools page. Click on Add User and follow the instructions below:
...
At this point, you've created your first User account under your Hubgets Organization.
#13 Configure customer connectivity settings
To do this, go to System → Cloud Management and follow the instructions below.
...
- In the Node Listing table, there's a Role column. Click on SIP and you will be prompted the Assign Role form.
- Scroll down to the Customer Connectivity section, enter your hostname in the Public WebRTC IP/Hostname field and press OK.
- Go back to the Node Listing table and click on Web Management Interface in the Role column.
- Scroll down to the Customer Connectivity section, enter your hostname in the Public IP/Hostname field and press OK.
#14 Set Google reCAPTCHA
Google reCAPTCHA is a free service that VoipNow and Hubgets use to prevent spam and other types of automated abuse. The Google reCaptcha is also required for the Page by Hubgets feature to be functional.
...
- Generate reCAPTCHA site key and secret key from here . Generate the keys for both your domain and subdomain.
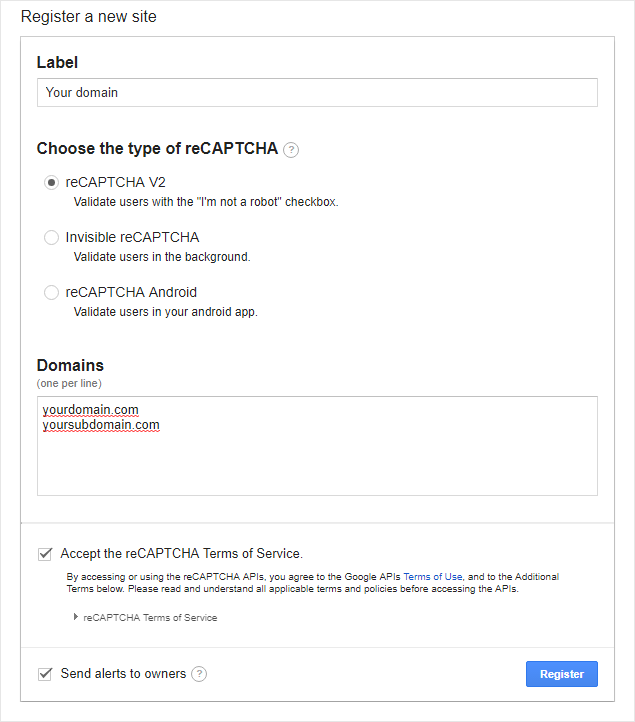
- Copy the keys and go to System → Unified Communications→ Zero Priority→ Integration → Google reCAPTCHA.
- Paste the keys in the Site key and Secret fields and press OK.
#15 Edit the local configuration file
Edit /etc/voipnow/local.conf and ensure you have the values as shown below:
| Code Block |
|---|
SIP_NOTIFICATIONS 1 KAM_WORKERS 15 HTTP_SERVER_NAME [yourhostname] |
#16 Restart services
All the changes you've made will only take place if you restart services using the commands below:
...
 Except where otherwise noted, content in this space is licensed under a Creative Commons Attribution 4.0 International.