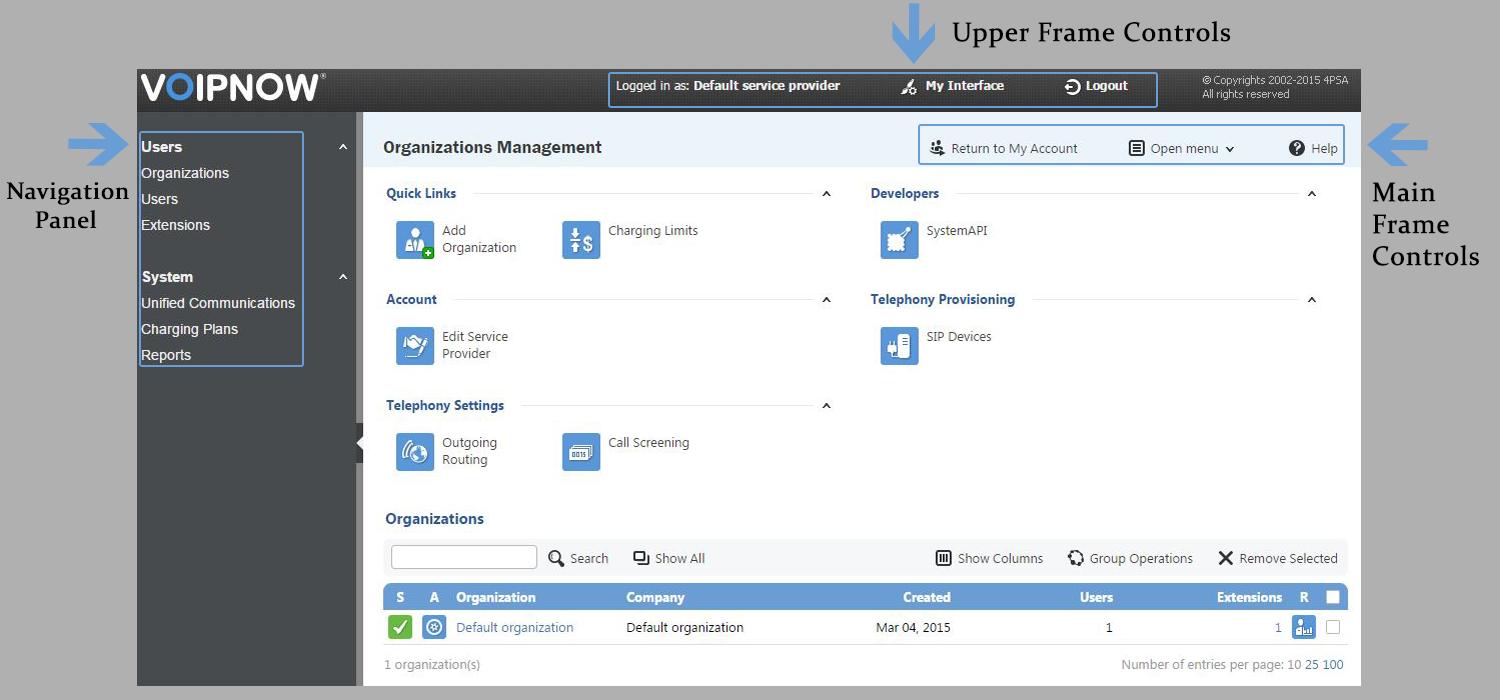
This page contains instructions on how to navigate through VoipNow's interface, detailing the menu and the controls available.
Overview
The interface has the same appearance no matter if you are an administrator or a regular user. If some options are not displayed, it is because you do not have access to them yet.
Any removal operation comes with a confirmation box, which allows you to cancel your action. You can keep track of your whereabouts by following the breadcrumb trail at the top left side of the interface.
Navigation panel
You'll find it on the upper left side of the screen. That's where we've grouped VoipNow's most important features. The number of sections displayed depend on your license and custom settings.
- Users: Provides access to management options available for the three types of accounts and for extensions: Service Providers, Organizations, Users, Extensions.
System: All server-related tools:
- Unified Communications – most of the tools for managing the platform.
- Cloud Management – facility for managing everything related to the VoipNow cloud infrastructure.
- Charging Plans – tools for creating and managing charging plans to be used by your system.
- Channels – tools for adding new channels or for managing channel-related preferences.
- Reports – comprehensive and fully-detailed call reports.
Automation: A business and operations automation solution built for SPs. This service does not get displayed unless you enable VoipNow Automation back-end. More on this in the VoipNow Automation guide.
Upper frame controls
They are always displayed in the upper right side of the screen and you can use them to log out or change your contact details or interface preferences.
- Logged in as: Edit your contact details or change your password.
- My Interface: Provides access to My Interface Settings page, where you can change your interface preferences.
- Logout: After logging out from your VoipNow account, the current session will be closed and you will be required to provide your credentials again the next time you log in.
Main frame controls
They are always displayed in the main frame and you can use them primarily for navigation and for opening the help page.
- Open menu: Opens a box listing all the options that are available in the left navigation panel and can be used for quick switching between pages.
- Help: Provides access to the wiki help page related to your current location at any point during navigation.
- Up level: Going down in the application structure, you will be able to move up one level and return to the previous page by using the Up level icon.
Some of the options are visible only in some situations:
- Return to my account: If you are impersonated as one of your child accounts and you want to return to your default account, simply click the appropriate Return to my account link.
- Refresh: In some pages that provide real-time statistics, you can update the displayed information by clicking the Refresh link.
Screenshot: The interface
Tables
In VoipNow, each table provides several configuration tools designed to offer you a better overview of the available records.
Customize tables
To set the total number of records displayed in each page:
Click the 10, 25, and 100 links available at the bottom right of the page, under the table. The total number of records as well as other details (e.g. call cost) are shown on the left side.
In tables with several pages of records, navigate between pages using the controls available.
To customize the table layout:
Click the Show Columns icon at the top right of the table.
Select the columns you want to see displayed. This is useful for tables with many columns that require scrolling to see all the information.
To sort the table by a specific criterion:
- Click a table header and the entire list will be sorted accordingly. The table header will be highlighted and an arrow will indicate how the list was sorted: in ascending or descending order.
- Change the order can be with another click on the corresponding header.
To remove table records:
- Select the records you want to delete.
- Click the Remove selected link and a confirmation pop-up window will be displayed.
- Click OK if you want to remove the record(s) or Cancel if you do not wish to proceed.
- In some cases, you will be redirected to another page and asked to review and confirm the removal.
Search tables
You can do either a simple search or an advanced one. Either way, the search criteria is retained until a new search is performed. When searching for a specific word, use the simple search controls described below.
- Search: Requires specific words that are relevant to what you are looking for. Click the Search link to display only the records that match your search criteria. The table will be updated accordingly.
- Show all: Displays the entire list.
In some cases, if you want to hide/reveal the Search options, you must click the Toggle search link.
Except where otherwise noted, content in this space is licensed under a Creative Commons Attribution 4.0 International.

