| Excerpt |
|---|
This page describes how to set up your first VoipNow login. |
...
In the VoipNow System Configuration Wizard page, you need to fill in the required contact information, set up your first accounts, charging plans as well as the 4PSA SIP demo channel.
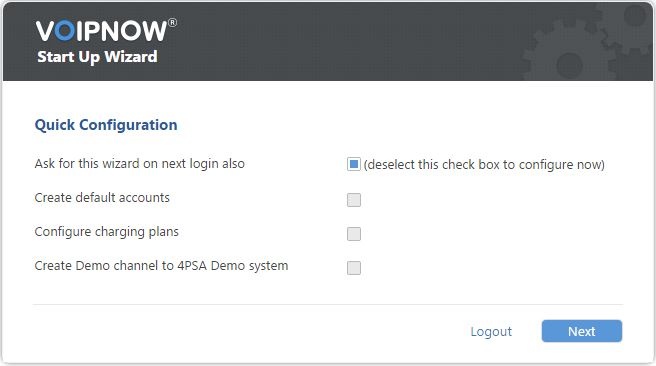 Image Modified
System configuration wizard
...
- Ask for this wizard on next login also: Select this option to be able to configure your system later on.
 Do not select this option if you want VoipNow System Configuration Wizard to configure the system now.
 - Create default client accounts: Create a default service provider, organization, user and extension. The accounts will be created using a random password, which you can change at any point later on.
- Create charging plans: Create default charging plans to be used by the newly created service provider, organization, user and extension. These charging plans allow unlimited calling and should be modified when the system is put in production.
- Create demo channel to 4PSA demo server: Create a SIP channel that will point to the 4PSA demo server.
...
In order to submit the information edited in the System Configuration Wizard page, simply click the Next button. This will redirect you to the VoipNow System Configuration Wizard report page :similar to the one below.
 Image Added
 Image Removed
You can abort the VoipNow Start Up Wizard by clicking the Logout button. This will take you back to the VoipNow login page.
...
At this point, you should start modifying the default Unified Communications >> Zero → Zero Priority settings.
For instance, the Server sends emails from address field is required, but it is recommended that you check the other fields as well.
 Image Removed
 Image Added
Video tutorial
Watch the video below to learn how to customize the basic settings grouped under the Zero Priority area.
This is where you can change SIP preferences, settings related to fax or charging, as well as monitoring and integration so that they can better suit your use scenarios.
...
| UI Expand |
|---|
|
Hi and welcome to our series of VoipNow server configuration tutorials. In these videos we assume that you have already installed VoipNow, or you have a VoipNow Cloud OnDemand instance. - First, log in to the system with your VoipNow credentials; the default username is
admin and the password is welcome. - Then enter the server admin details such as company name, contact address, city, country, email and time zone; all fields marked with a star are mandatory.
- Once you’ve done that, you can start configuring the system. Go to Unified Communications and click on the Zero Priority icon.
- You’ll have several tabs, each with its corresponding settings; in the General tab, you can set the codecs used by the server, the voicemail preferences, as well as other parameters.
- One of the important settings here is the one for “Messages shorter than”, in the Voicemail section; voicemail messages that are shorter than the value you enter in this field will not be saved.
- Under the SIP tab you can set the length of extensions; this is by default set to 3. You can also set the SIP registration parameters and then the separator between the organization ID and the user number. This is by default set to star.
- What’s important to remember is that these configurations can only be done if there are no extensions on your VoipNow system.
- If you have a domain or subdomain (like sip.hostname.com), then you will need to specify it in the Advanced SIP settings area. This is needed for your phones to register to that address.
- Next, the Fax tab. Here you can enable VoipNow’s fax function, including the fax2email and email2fax features. For email2fax and fax2email to work, you need to set a hostname for the server as well as an e-mail address where the faxes will be received.
- Continue with the Charging tab, where you can activate VoipNow’s charging feature. This will allow you to create charging plans and assign them to your user accounts (Service Provider, Organization, User).
- Charging plans determine how phone calls are charged inside the VoipNow system. You need to set up the currency (the default is USD), currency subdivision and local calls charging policy.
- Local calls are calls between users on the same Voipnow server, meaning they don’t pass to public telephone network through a VoIP gateway. Extended local calls are calls between extensions from different organizations, on the same VoipNow server.
- Now let’s set up role monitoring in the Monitoring tab. Here you need to activate the agents that monitor main VoipNow services and send alerts by email when a service is down.
- Finally, in the Integration tab you can activate integration with VoipNow Automation, a module that allows billing, invoicing, and account provisioning functions.
- When you have completed all of the settings that have been covered in this video, please proceed to the video tutorial in the Setting the SIP Channels page.
|
...
...
...
 Except where otherwise noted, content in this space is licensed under a Creative Commons Attribution 4.0 International.