

Initial Configuration
This page describes how to set up your first VoipNow login.
Access Details
Address
When the VoipNow installation is finished, open your browser and go to:
https://<SERVER-IP-ADDRESS>If the value of <SERVER-IP-ADDRESS> corresponds to a valid Hostname, you can also reach the interface by using:
https://hostnameLogin
""
In order to use the product, you must agree to the End User License Agreement (EULA).
You will also be required to provide a license key. Click the Browse button and choose the license key file provided with VoipNow. If the license file is valid, you are redirected to the VoipNow System Configuration Wizard page.
Initial Settings
In the VoipNow System Configuration Wizard page, you need to fill in the required contact information, set up your first accounts, charging plans as well as the 4PSA SIP demo channel. 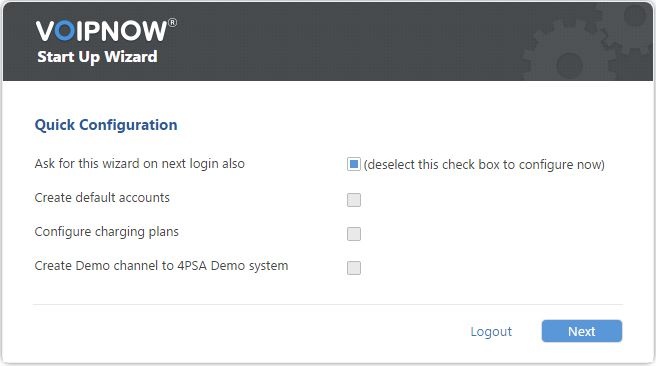
System Configuration Wizard
This area allows you to set up the necessary contact information as detailed below:
- Administrator password
- Confirm administrator password
- Administrator email
Password Change We strongly advise you to change the original welcome login password to a strong password.
Automatic Configuration
This area is designed for you to set up your default accounts, charging plans and 4PSA demo channel.
- Ask for this wizard on next login also: Select this option to be able to configure your system later on.
 Do not select this option if you want VoipNow System Configuration Wizard to configure the system now.
 - Create default client accounts: Create a default service provider, organization, user and extension. The accounts will be created using a random password, which you can change at any point later on.
- Create charging plans: Create default charging plans to be used by the newly created service provider, organization, user and extension. These charging plans allow unlimited calling and should be modified when the system is put in production.
- Create demo channel to 4PSA demo server: Create a SIP channel that will point to the 4PSA demo server.
Navigation
In order to submit the information edited in the System Configuration Wizard page, simply click the Next button. This will redirect you to the VoipNow System Configuration Wizard report page similar to the one below.
You can abort the VoipNow Start Up Wizard by clicking the Logout button. This will take you back to the VoipNow login page. In the Admin contact information page, you will be required to fill in a form that will allow you to use VoipNow. At this point, you should start modifying the default Unified Communications → Zero Priority settings. For instance, the Server sends emails from address field is required, but it is recommended that you check the other fields as well.