This page contains instructions on how to send faxes from a Phone terminal extension.
Overview
To send and manage faxes from your extension, access the Send Fax icon from your extension's context page.
VoipNow allows the extensions to send fax messages using:
- email messages, by attaching the fax content as a .pdf, .jpg, .txt or .tiff file to an email message, which is sent to a special faxing email address on the server. For more information, read this knowledge base article.
- the VoipNow interface, by uploading a fax message as a .pdf, .jpg, .txt or .tiff file using the controls available in the Sent Fax Messages of Extension <extension_name> page, available for all the Phone terminal extensions that were configured to manage fax files.
If you're using the email2fax feature, it is not mandatory to use attachments. You can insert the fax message in the email body. Or, if you want to use attachments, you may leave the email body empty.
The Sent Fax Messages from Extension <extension_name> management page allows you to:
- view the already Sent Faxes or those that are in process of being sent
- upload and send a new fax message using the controls available in the Upload Fax Files section
- search for certain sent fax messages
Upload a fax file
To upload a fax file:
- Customize the fields below in the Upload Fax Files section:
- Send fax to recipients <number> Phone numbers (separated by commas): Specify the phone numbers you want to send the fax to. You cannot list more phone numbers than the Maximum number of fax recipients set from the Unified Communications → Settings → Zero Priority → Fax preferences.
- Fax file: Use the Browse button to locate the file(s) you want send. You cannot add more files than the Maximum number of files per composed fax set from the Unified Communications → Unified Communications → Settings → Zero Priority → Fax preferences. Only .pdf, .jpg, .txt and .tiff file types are supported. Use the +/- buttons to add several files to the fax message.
- Send later: When selected, the fax message will be saved under the status Not approved. Later, you will be able to click the Approved link in order to send the fax to its recipient(s).
- Click OK to upload the new fax. Click Cancel to return to the previous page without sending the message.
Change fax status
You can see the status of a a message in the Sent Fax History table. A fax can have several statuses, some of which may require that you take a certain action. All statuses are explained below.
| Status | Description |
|---|---|
| Not approved | The fax message has not been approved. |
| Pre-Approved | The Pre-Approved Fax mechanism, which is available only for faxes sent through UnifiedAPI requests, implies sending a fax message to a particular extension without adding its authorized source email address in VoipNow. The Pre-Approved status no longer requires confirmation for a fax message; it is automatically sent in a matter of minutes. |
| Approved | The fax message is approved and can be sent by clicking the link. |
| Scheduled For Sending | The fax message is scheduled for sending and VoipNow tries to deliver it to the destination. |
| Sent | The fax message was successfully sent to all recipients. |
| Partially Sent | The fax message was sent only to some of the recipients. Click the link to finalize the operation. |
| Send Failed | The fax message was not sent due to an error. Click the link to send it again. If a fax message's status is Partially sent or Send failed, you can reschedule it for sending by clicking either its status, either the Resend link available in the Sent on column. |
| Canceled | This fax message will no longer be sent to anyone. This status is displayed after clicking the Cancel link available in the Sent on column. |
| Purged | A fax message reaches this status after it is erased from the system. This happens when the fax message has been stored in the system longer then the number of days allowed. |
Approval status
The Approved column displays the fax message's approval status:
- Yes: The fax message is approved. All the fax messages added from the interface are already approved.
- No: The fax message has not been approved yet. It can be either preapproved, if the Status column displays Pre-Approved, or a regular unapproved email2fax message. You can click the No link to manually approve the fax. The Pre-Approved status applies only to fax messages sent through UnifiedAPI requests.
- --: This sign is displayed when an unapproved fax message was removed from the system.
Sent on column
This field has different values, depending on the fax message status.
- If the fax message status is Sent or Partially sent, then the date when it was sent is displayed.
- If the status is Send failed, then two links are displayed:
- Resend - Click the link to retry to send the fax.
- Cancel - Click the link if you do not want to send the fax message anymore. The status is changed to Canceled.
- If the fax message's status is different from the above values, then only the Cancel link is displayed.
Fax info
Click the  icon to view all the attempts to send the message and their outcome.
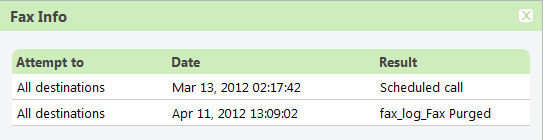
Screenshot: Fax Info Pop-up
The message displayed above the table shows the IP address from where the fax message sending was approved, for example 192.168.1.22.
The following information is available for each attempt:
- Attempt To: The recipient's phone number. When there are two or more recipients, the phone number is replaced by All destinations.
- Date: This is the date when the system tried to send the fax.
- Result: This is the sending process outcome.
The first line displayed in the pop-up window for all the fax messages shows that the application initiated the call in order to send the fax to all the specified destinations.
Search for sent faxes
When you are searching for specific sent faxes, you can use one or more of the available filters:
Search in faxes <extension_number> between <starting_date> and <ending_date>
Where:
<extension_number>: Specify the number of the extension the fax message was sent to.
<starting_date>: Specify the starting date of the time interval in which you want to search for particular messages. This date must be before or equal to the date the fax was added. The date format must be yyyy-mm-dd.
<ending_date>: Specify the ending date of the time interval in which you want to search for particular messages. This date must be after or equal to the date the fax was added. The date format must be yyyy-mm-dd.
 Except where otherwise noted, content in this space is licensed under a Creative Commons Attribution 4.0 International.