The code is on GitHub
Download here. Do not hesitate to contribute if you want to improve this example - we welcome Pull Requests!
Overview
Click2Fax is an App written in PHP that allows anyone to send faxes using the UnifiedAPI. It uses the Fax resource exposed by Unified API and the following request:
- Create Faxes - Send fax to any number without need of approval
Installation
In order to be able to use the Click2Fax App, your system must be compliant with the requirement below:
- Your system needs to have PHP 5.3 installed or higher
- Your VoipNow server must be at least version 3.0.0
- The extension should be able to send faxes
Setup
STEP 1: Switch to the directory that can be accessed over web (e.g /var/www/html) and download the files.
You also need to give proper permissions and ownership right for the files of the plugin - the plugin needs to be owned by the web server user and group. For example, if we use httpd as a webserver:
chmod -R 755 <PATH_TO_Click2Fax>
chown -R httpd:httpd <PATH_TO_Click2Fax>
In order to use the App, you must configure it. To do so, open the file config.php in the <PATH_TO_Click2FAX>/config/config.php and change the following settings:
| Name | Description |
|---|---|
| VN_SERVER_IP | The IP or hostname of your VoipNow server. |
| VN_EXTENSION | The extended number of a phone terminal extension. |
| OAUTH_APP_ID | OAuth App ID or key. A 32 char-long string used by the App to identify itself with the system. Check this page to learn how to obtain the OAuth APP ID. |
| OAUTH_APP_SECRET | OAuth App Secret. A 32 char-long secret used by the system to establish ownership of the App ID or key. Based on this pair, the system will recognize the new App and will allow it to generate an access token. Check this page to learn how to obtain the Secret. |
STEP 4: Setup the system.
You also need to make sure the VoipNow system is set to receive faxes.
Behavior
User interface
As soon as the setup process is complete, you can access the interface at https://<IP>/<PATH_TO_CLICK2FAX>/.
The page displays a single button for sending faxes. Click this button and a form similar to the one below will be displayed.
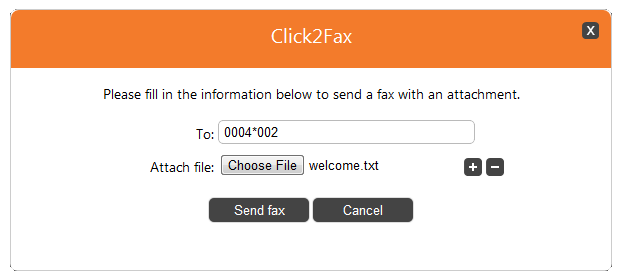
To send the fax, you must fill in the form following the explanations below.
Field name | Required | Description |
|---|---|---|
To | Yes | A list of phone numbers separated by a comma. You can set here a VoipNow extension that accepts faxes. |
Attachments | Yes | Choose a file to send as the fax body . |
Once you have filled in the form correctly, press the Send fax button.
Internal flow
As soon as the Send fax button is pressed, the scripts sends a Create Faxes request to the VoipNow server throughUnifiedAPI. It uses the extension defined in the global variable VN_EXTENSION as the source of the fax call.
First it sets the HTTP headers and the Request body accordingly:
 $token = generateToken();
 if (!$token) {
    return false;
 }

 $faxRequest = new FaxRequest();
 $faxRequest->initHeaders(array(
     'Authorization: ' . $token
 ));

$params = array(
    'recipients' => array($_POST['to'])
);


//Set fax information (ex. recipients list)
$this->_payload['request'] = json_encode($params);

// Set uploaded files to send them by fax
foreach ($files as $fileAlias => $fileInfo) {
    $this->_payload[$fileAlias] = new CURLFile($fileInfo['location'], $fileInfo['type'], $fileInfo['name']);
}


$response = $faxRequest->execute();
The HTTP Request made by the App looks like this:
POST /uapi/faxes/@me/0003*210 HTTP/1.1
HOST x.x.x.x
Authorization: <OAUTH_ACCESS_TOKEN>
Content-Length:469
Content-Type: multipart/form-data; boundary=------------325343636
------------325343636--------
Content-Disposition:form-data; name="files"; filename="/path/to/file/file.ext"
Content-Type;application/octet-stream

This is my fax
------------325343636
Content-Disposition:form-data; name="request";
{
  "recipients":[<FAX_EXTENSION_TO>]
}
------------325343636
Then sets the files which have been uploaded through the browser:
$files = array();

$numberOfFiles = count($_FILES['attachments']['name']);
for ($i = 0; $i < $numberOfFiles; $i++) {
    if ($_FILES['attachments']['error'][$i] > 0) {
        continue;
    }

    $files[$_FILES['attachments']['name'][$i]] = array(
        'location' => $_FILES['attachments']['tmp_name'][$i],
        'type' => $_FILES['attachments']['type'][$i],
        'name' => $_FILES['attachments']['name'][$i]
    );
}
Any errors will be displayed on the browser.
Your Voipnow SSL certificate should be signed by a trusted certificate authority, otherwise the Click2Fax application will not be able to communicate safely with the server. You can use a self-signed certificate, but we do not recommend this on a production server.
For testing purposes only, you may add the following line into the generateToken() function available in /plib/util/.
curl_setopt($httpRequest, CURLOPT_SSL_VERIFYPEER, false);
// this should be added before curl_exec($httpRequest);
 Except where otherwise noted, content in this space is licensed under a Creative Commons Attribution 4.0 International.