This page contains instructions on how to match calls to a certain period of time using time intervals. |
To reach the Time Intervals Management page, go to Unified Communications in the side menu and click on the Time Intervals option under the Assets area. You will be able to:
Time intervals are used on call filtering, call routing, charging plans, etc. When a new account is created, it can have a charging plan associated to it and time intervals will be used to set up that charging plan. The account is charged differently based on the call time interval. You can enter up to ten different time interval limits to a single time interval.
To add a new time interval:
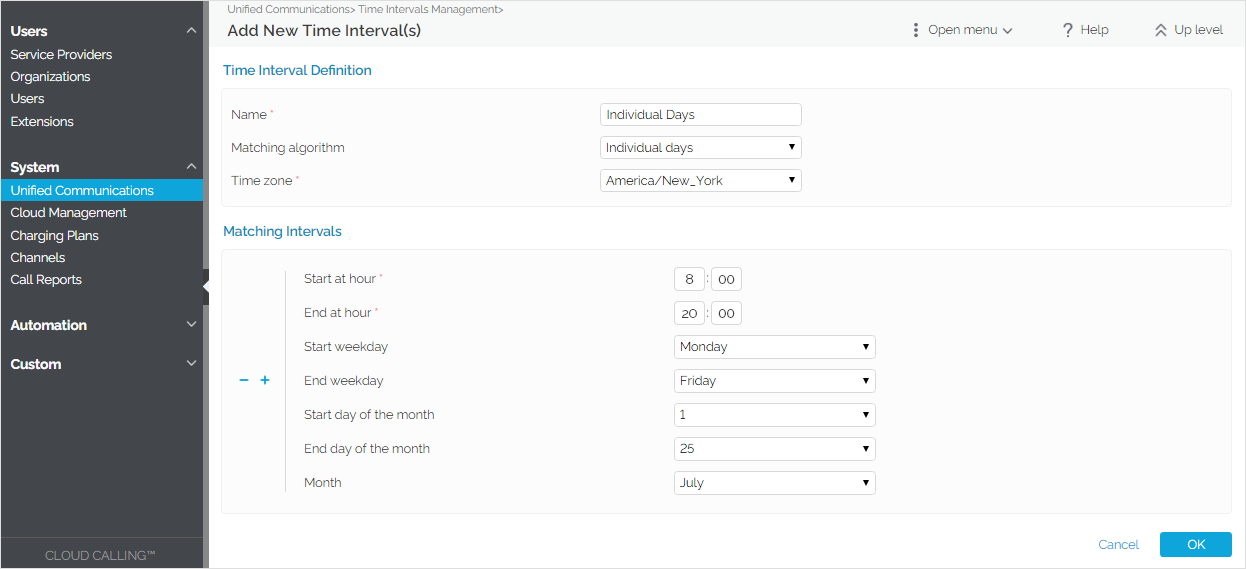
Name: A descriptive name for the time interval.
Matching algorithm: Calls can be matched to an existing time interval depending on an algorithm.
Time zone: Select the time zone in which your time interval is defined. Default value: Server default. This detail is also displayed in the time intervals list, next to the interval's name. In the description of a charging plan, this info is listed in the Charges for Outgoing Calls area.
Start at hour and End at hour: Specify the hours that mark the time interval limits.
Start weekday and End weekday: Select the days of the week that mark the time interval limits.
Start day of month and End day of: Select the days of the month that mark the time interval limits.
Month: Select the month that defines the time interval. If you want this time interval to be applied for all the months, select '-'.
Here you can find some examples for the different settings you can choose in the matching algorithm drop-down box.
In the time interval below, VoipNow matches the calls made or received between 8:00 AM and 8:00 PM, on Monday, Tuesday, Wednesday, Thursday and Friday, between the 1st and the 25th of July.

In the time interval below, VoipNow matches the calls made or received between Monday, 8:00 AM and Friday, 8:00 PM, between the 1st and the 25th of July.

To edit a time interval, apply the same steps as above. |
The system allows you to filter the list of existing time intervals using their name. Just enter the name of the interval in the text box located above the table and click the  Search button.
The system remembers the search criteria when a new search is performed and even after the user logs out.
To remove a time interval:
voipnow300_pbx/options/edit_time |
voipnow300_pbx/options/time_intervals |